Paint Protection Film (PPF) is like an invisible superhero for your car's paint, guarding it against light scratches, chips, and everyday wear. But even the toughest films aren't completely immune to damage. When your PPF takes a hit, knowing how to fix it quickly can save you money and keep your car looking sharp. This guide walks you through simple steps to assess and repair common problems, whether you're dealing with light scratches or bigger tears. Consider it your go-to playbook for keeping that protective layer in top shape without stress or confusion.
To repair damaged PPF, start by assessing the severity of the damage. Minor surface scratches often self-heal with heat application, while deeper cuts or tears require professional patching or full film replacement. Clean the affected area thoroughly, apply gentle heat using a heat gun or hairdryer to activate self-healing properties for light scratches, and for significant damage, consider consulting a professional detailer to either patch or replace the compromised sections to maintain optimal paint protection.
Guide to Repairing Damaged PPF
Superficial light scratches and light swirls on PPF often self-heal with gentle heat. Using a hairdryer or heat gun at around 140°F (60°C), warm the area lightly and smooth it with your fingers or a soft cloth. Avoid overheating, especially on matte finishes or film edges.
Deeper issues, cuts, tears, or lifted edges, require more than heat, as the protective layer is compromised. These should be patched or the panel replaced to prevent paint exposure and further damage. Before any repair, clean the area with mild soap, rinse, and fully dry. Painter’s tape can help protect nearby paint.
Small tears under an inch can be fixed with a matching patch cut slightly larger than the damaged spot. Apply adhesive sparingly, position accurately, and remove air bubbles with a squeegee. Large cracks, discoloration, bubbling, or peeling typically call for full panel replacement. Warm the old film to loosen adhesive, peel carefully, clean residue with isopropyl alcohol, and install new film using slip solution for proper alignment and bubble-free adhesion.
PPF Damage Repair Guide
Light Scratches: For minor scratches, the recommended repair method is heat application and gentle smoothing. You will need a heat gun or hairdryer and a microfiber cloth. Repeat heating if necessary to achieve a smooth finish.
Small Tears (<1"): Small tears can be fixed using patch application. Required tools include adhesive, a matching film patch, and a squeegee. Accurate trimming of the patch is essential for a seamless repair.
Large Damage: Extensive damage requires full panel removal and replacement. You will need a heat gun and a razor blade or film cutter. Professional assistance is advised to ensure proper installation and finish.
Bubbling (<1"): For minor bubbling, the recommended method is needle puncture and squeegee. Use a fine needle and squeegee to smooth out the area. Avoid this method if the bubble is larger than 1 inch.
Regular inspection complements repair efforts by catching early signs of wear before escalating into costly fixes. Washing PPF biweekly with pH-neutral soaps and applying ceramic coatings every six months can extend its lifespan significantly.
Proper care and timely repairs keep your film functioning as a resilient shield against daily hazards. With basics covered here, focus next on managing those minor scratches that commonly appear during everyday driving.
Addressing Minor Scratches
Most modern PPFs, contain heat responsive polymers that allow light scratches to self heal. Applying gentle, controlled warmth softens the film so shallow marks blend back in. Use a hairdryer or low setting heat gun held about six inches from the surface and move it slowly in circles to avoid hot spots.
Within a minute or two, minor scratches often fade as the polymers relax. You can repeat the process for slightly stubborn marks. The key is patience and low heat. Too much warmth can warp the film or damage the paint underneath, so slow and steady heating gives the best results.
Manual Polishing
If you prefer not to use heat, manual polishing is a simple alternative for light PPF scratches. Use a plastic-safe polishing compound made specifically for films and apply a small amount to a clean microfiber cloth. With gentle circular motions, lightly buff the scratched area to smooth surface imperfections and improve clarity.
Avoid heavy pressure or using paint-only compounds because they can damage the film. After 30 to 60 seconds of polishing, wipe away the residue and check the area in natural light. If needed, repeat once more. Finishing with a PPF-safe sealant or wax adds protection and helps maintain the repaired surface.
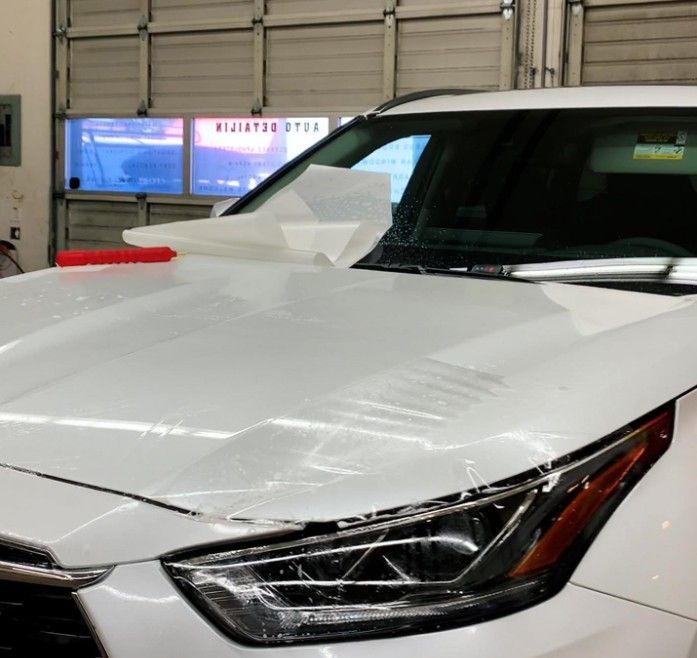
Fixing Larger Tears
For tears spanning several inches or with jagged edges, patching is necessary to prevent dirt, moisture, and damage to the paint. Start by cleaning the area with mild soap and a microfiber cloth to ensure proper adhesion.
Trim a matching PPF piece slightly larger than the tear and apply adhesive if needed. Carefully position the patch, avoiding dust or wrinkles, and use a squeegee from the center outward to remove air bubbles. Allow the adhesive to cure for 24 to 48 hours without moisture exposure.
If the damage covers a larger area or involves peeling edges, a full panel replacement may be required.
Full Section Replacement
Replacing entire PPF panels is necessary for extensive tears or cracks to restore full protection. Warm the existing film with a heat gun (120°C - 150°C) to soften the adhesive and peel it off carefully without damaging the paint. Clean the surface thoroughly with isopropyl alcohol to remove any residue.
Cut the new film slightly larger than the area and spray both the surface and film with a water and mild soap mixture for easier placement. Use a squeegee to remove air bubbles and excess liquid, then trim edges for a seamless finish. Allow the film to cure for 48 hours before washing or exposure to ensure strong adhesion and longevity.
PPF Repair Quick Reference Guide
When repairing PPF or vinyl, maintain a heat-gun temperature of 120–150°C to safely soften the adhesive. Always cut your patch at least 0.25 inch larger than the damaged area for proper coverage. After applying the patch, allow 24–48 hours of drying time before exposing the surface to moisture. Use essential tools like a squeegee, sharp utility knife, and installation liquid to ensure a clean and secure application. Quality repair patches usually offer an adhesion strength of 15–20 N/cm, helping the repair stay durable and long-lasting.
With care and proper tools, you can restore your PPF's protection while maintaining your car's showroom appearance. Deciding whether to patch or replace hinges on weighing cost against damage severity and how long you plan to keep your vehicle shielded without risking paint deterioration underneath. This understanding naturally leads us into strategies that help preserve your PPF's condition effectively over time.

Maintaining PPF Condition
Regular care is essential to keep Paint Protection Film looking and performing its best. Gentle, consistent cleaning preserves clarity and hydrophobic properties that make dirt bead off effortlessly. Use pH-neutral shampoos designed for automotive paint films, such as Gtechniq Ceramic Gwash, along with a microfiber mitt and the two-bucket wash method to avoid light scratches. Avoid abrasive cleaners, harsh detergents, or steel wool, which can damage the film.
After washing, apply a quality quick detailer like CarPro Elixir to restore gloss and water repellency. For longer-lasting protection with less effort, CarPro Hydr02 Foam provides up to three months of hydrophobic defense via snow foam application, simply apply, let sit, then rinse before drying. Regular maintenance ensures your PPF continues protecting your vehicle while maintaining a showroom finish.
PPF Maintenance & Care Summary
For proper PPF care, start with gentle weekly washing using a pH-neutral shampoo and a microfiber mitt. After every wash, follow up with quick detailing using products like CarPro Elixir and a microfiber drying towel to maintain gloss and cleanliness. Every three months, apply hydrophobic foam with a snow foam cannon to enhance water beading. For long-term protection, perform waxing or sealing every 2–3 months using PPF-safe products and an applicator pad. Make it a habit to inspect the film monthly under good lighting to catch early signs of damage. Finally, reapply sealant annually with a PPF-safe sealant and a microfiber cloth to keep the film performing at its best.
Even the best PPF cannot fix pre-existing paint imperfections, so true shine comes from meticulous prep work by skilled professionals like Garvin Auto Spa, ensuring every surface reflects light perfectly. Regular inspections under bright light help spot lifting edges or damage early, preventing bigger issues.
Maintaining PPF is simple with the right products and consistent attention. Small, regular efforts keep your film protecting the paint and your vehicle looking showroom-ready for years. With proper upkeep, you can confidently address damage through DIY fixes or professional solutions to preserve PPF integrity.
DIY vs. Professional Repair Options
DIY PPF repairs can be tempting for minor scratches or nicks, as kits are affordable and allow hands-on care. These repairs require patience, a steady hand, and knowledge of handling automotive films. The process involves cleaning the area, applying a patch or repair solution carefully, and allowing it to cure properly. Rushing can cause air bubbles or uneven edges, potentially reducing the film’s protection.
For best results, watch trusted tutorial videos or consult experts like Garvin Auto Spa to understand how the film reacts to heat and which cleaning agents to use. DIY repairs work well for small flaws, but larger damage often requires professional attention.
Professional Repairs
For significant tears, edge lifting, discoloration, or damage beyond minor scratches, professional repairs are the best choice. Experts at Garvin Auto Spa use specialized tools and experience to apply and repair PPF accurately, often with warranties for quality and longevity. They ensure seamless matching of replacement sections and proper adhesion, avoiding bubbles or peeling. Professionals also save time by efficiently handling cleaning, heat application, and inspection. Signs like yellowing, persistent edge lift, or loss of hydrophobic properties indicate it’s time to seek expert care to protect your investment.
DIY vs Professional Repair – Key Differences Explained
DIY repair offers a lower upfront cost and requires a moderate skill level, relying mainly on patience and precision. It typically uses basic repair kits, takes several hours to complete, and is best suited for minor damage, though it usually comes with no warranty. On the other hand, professional repair involves a higher cost but provides high expertise, uses specialized equipment and materials, and is often completed much faster. Professional services usually include warranty coverage and are ideal for serious or large-scale repairs, making them a more reliable long-term solution.
Ultimately, if protecting your vehicle's perfect finish matters to you, the wisest path balances your comfort with risk: handle straightforward minor scratches yourself but let skilled professionals manage anything more severe. Their attention to detail ensures that your PPF continues shielding your car beautifully for years without costly follow-up repairs.
Understanding how timely repairs preserve PPF integrity naturally leads us into exploring the best ways to maintain its fresh appearance every day. Practical maintenance strategies will keep protection looking as brilliant as the day it was applied.
Keeping PPF Looking New
The key to preserving Paint Protection Film's pristine condition lies in regular, gentle cleaning combined with smart habits that prevent premature wear. For starters, parking your car in shaded areas or under a cover substantially reduces the harmful effects of UV rays. Over time, excessive sun exposure can cause the film to yellow or lose its clarity, something no car owner wants to see on their vehicle's finish.
Regular Cleaning
Wash your PPF every one to two weeks, depending on driving conditions, to prevent dirt, grime, and road salts from degrading the film. Always use PPF-specific, gentle cleaning products to avoid micro-abrasions. After washing, dry thoroughly with a soft microfiber towel to prevent water spots, ensuring the film stays clear and protected while maintaining a polished finish.
Proactive Measures
Use a high-quality protectant spray every few months to shield PPF from bird droppings, bug splatter, and tree sap while enhancing its self-healing properties. Avoid automatic car washes with abrasive brushes or harsh chemicals, as they can scratch or lift the film. Inspect your PPF monthly for bubbles, edge lifting, or discoloration to catch issues early. These simple routines significantly extend the film’s life and maintain a showroom finish. Garvin Auto Spa offers guidance on selecting the right products for optimal care.
Protect Your Vehicle with Expert PPF Care
Ensure your Paint Protection Film stays flawless and your car looks showroom-ready. Contact Garvin Auto Spa today for professional maintenance tips, repair services, and high-quality products designed to extend the life of your PPF.
Call 503-472-4278 or visit Garvin Auto Spa to schedule your service and keep your vehicle protected.